The Use of Navisworks for sectioning 3D models
The 3D workspace in Navisworks enables you to cross-section your model while sectioning for the current viewpoint. Object animations and viewpoint animations are also able to use section planes to show a dynamically sectioned model. If you use the box mode, you can narrow your focus to specific areas of the model. Scene View displays only the geometry contained within the defined section box when you move it. Two-dimensional sheets cannot section.
- In cross sections, you can see inside a 3D object.
- Using the "Viewpoint" tab, select the Sectioning panel and click "Enable/disable sectioning" to enable/disable sectioning for the current viewpoint. A contextual tab for Sectioning Tools appears on the ribbon when sectioning is enabled.
Sectioning tools are divided into two categories, Planes and Box, on the Mode panel.
It is possible to slice any plane into six sections while still being able to navigate, allowing you to see inside models without hiding anything. Model section planes are normally created through model's center.
Adjust the Size & Position of the Section Planes or Box
'Transform panel' under the Sectioning Tools tab contains tools that can adjust the position and size of the section plane or section box so that you can focus on specific and limited regions of a model. There is also a Move, Rotate, Scale gizmo, and input fields that allow numeric value entry.
If any of the objects in the current selection are moving out of the section planes or the section box, you can also adjust the movement limits by selecting the 'Fit Selection' option on the ribbon. Click 'Fit Selection' after selecting the desired objects in the 'Scene View' or in the 'Selection Tree'. According to the segmentation mode, the active sections planes or the section box move to the selection border.
How to Turn Sectioning on or off for the Current Viewpoint?
You can turn sectioning on or off for the current viewpoint.
- First, go to the Viewpoint Tab.
- Sectioning panel
- Enable Sectioning for on or disable sectioning for off.
Utilization & Enabling of Section Planes
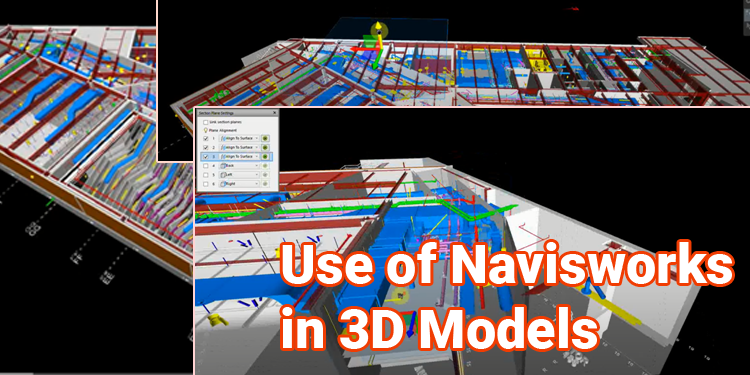
The section planes of your model can enable up to six times. In 'enabled' mode, a plane traverses the scene or affects it in some way. It is the current plane that is visible in Scene View. A selected plane will be automatically enabled when clicked on if it hasn't been enabled already.
Section planes created with default alignment and position upon activation. The following section plane enables alignment, position, and rotation as well as the section planes, alignment, and rotation settings. You must save the current viewpoint in sectioning mode and with section planes enabled.
In default mode, a section plane is created within the view, centered as much as possible. The wireframe of a section plane appears light blue in the diagram. The corresponding gizmo button can toggle to hide the visual plane representation
Section Box - Enable & Use
A section box allows you to focus on specific and limited parts of the model during your review. You can move, rotate, and scale the section box using the sectioning gizmos found in the Transform panel tab under Sectioning Tools. Numerically manipulating the section box is also possible.
There is one location or rotation for all gizmos. The position of one gizmo is affected by the move of another. Unless you select another gizmo before activating a section box, section boxes enable by default using the move gizmo.
At first, a section box's size defaults to the viewpoint bounds. To prevent parts of the box from being drawn off-screen, the box must fill the view. When a section box is enabled, it restores the position, rotation, and scale of the current viewpoint, if it saves.
Section box settings such as position, rotation, and size must save, and the current viewport must save with sectioning turned on and box mode.